Annotating Screenshots with Ksnip
Prerequisites and assumptions
- Rocky 9.4 Workstation
sudoprivileges
Introduction
Ksnip is a screenshot utility feature rich with tools for annotating screenshots. This guide focuses on installing Ksnip and its annotation tools.
Install Ksnip
Ksnip requires the EPEL repository. If you do not have the EPEL enabled, you can do that with:
sudo dnf install epel-release
Then perform a system update:
sudo dnf update -y
Now, install Ksnip:
sudo dnf install ksnip -y
Open an image
- Open Ksnip
- Click
File > Open - Select the image you want to annotate

Annotate an image with Ksnip
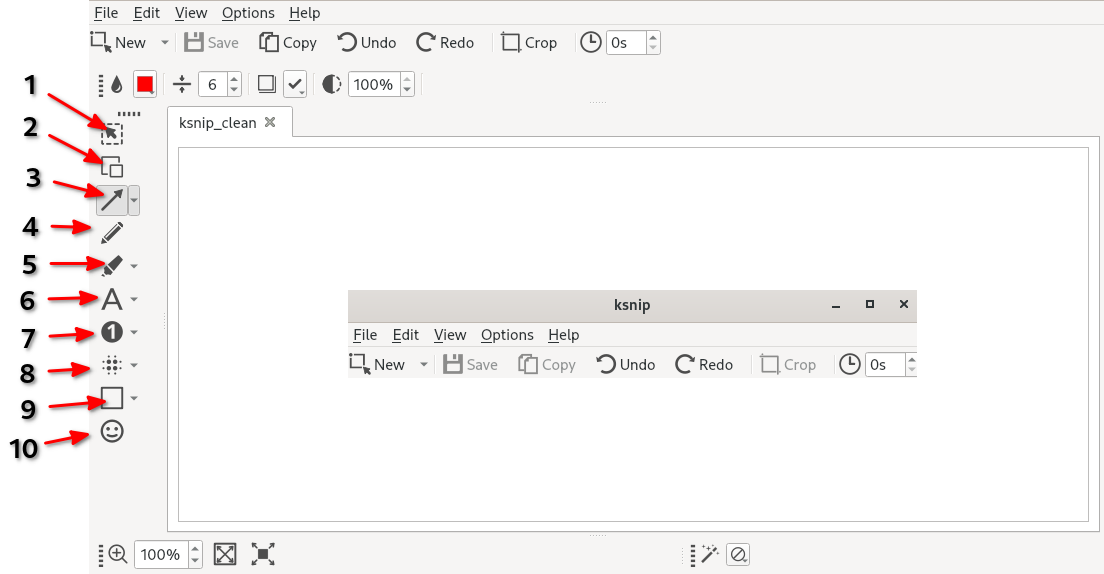
Ksnip has handy and intuitive tools to annotate screenshots. In the image, down the left side are the options described below.
The Select tool: used to make a selection. Click an item to select it or click and drag to make a selection.
The Duplicate tool: used to duplicate a selection. Click and drag to make a selection. Then click and drag the selection to move or further transform it.
The Arrow tool: used to create arrows. Click and drag to create an arrow.
The Double Arrow tool (chosen by clicking the down arrow next to the arrow): used to create double-sided arrows. Click and drag to create a double-sided arrow.
The Line tool: used to create straight lines. Click and drag to create a line.
The Pen tool: used to make strokes that resemble a pen. Click and move the cursor across the screenshot to use the Pen. Customization options exist to change the style and stroke of the Pen in the top toolbar.
The Marker Pen tool: used to make strokes that resemble a highlighter. Hold click and move drag the cursor across the screenshot to use the Marker Pen. Customizations exist to change the opacity in the top toolbar.
The Marker Rectangle tool: is the Marker Pen tool, but when you click and drag your cursor, the Marker Rectangle tool will fill the rectangular selection. Customizations exist to change the opacity in the top toolbar.
The Marker Ellipse tool: is the Marker Pen tool, but when you left-click and drag your cursor, the Marker Ellipse tool will fill the ellipse made from the selection. Customizations exist to change the opacity in the top toolbar.
The Text tool: used to annotate a screenshot with text. Click anywhere on the image and begin typing to use the Text tool. Customizations exist in the top toolbar to change the border, color, font-family, font-size, font-style, and opacity of your text.
The Text Pointer tool: used to annotate a screenshot with text attached to a pointer. The pointer should bring attention to the text, similar to the Text Arrow tool.
The Text Arrow tool: used to annotate a screenshot with text attached to an arrow. The pointer should bring attention to the text, similar to the Text Pointer tool.
The Number tool: used to annotate a screenshot with a numbered shape. Click anywhere on the image to place a numbered shape. Customizations exist in the top toolbar to change the color, width, and opacity.
The Number Pointer tool: used to annotate a screenshot with a numbered shape attached to a pointer. Click anywhere on the image to place a numbered shape attached to a pointer. Customizations exist in the top toolbar to change the color, width, and opacity.
The Number Arrow tool: used to annotate a screenshot with a numbered shape attached to a pointer. Click anywhere on the image to place a numbered shape attached to an arrow. Customizations exist in the top toolbar to change the color, width, and opacity.
The Blur tool: used to blur a selection. Left-click and drag anywhere on the screenshot to blur a selection.
The Pixelate tool: used to pixelate a selection. Left-click and drag anywhere on the screenshot to pixelate a selection.
The Rectangle tool: used to make a rectangle from a selection. Left-click and drag anywhere on the screenshot to make rectangular selection. Customizations exist in the top toolbar to change the color, width, and opacity.
The Ellipse tool: used to make an ellipse from a selection. Left-click and drag anywhere on the screenshot to place an ellipse. Customizations exist in the top toolbar to change the color, width, and opacity.
The Sticker tool: used to place a sticker or emoji on a screenshot. Selecting the tool and clicking will place the sticker.
Conclusion
Ksnip is an excellent utility for annotating screenshots. It can also take screenshots, however the main focus of this guide is the annotation capabilities and tools provided by Ksnip.
Checkout the Ksnip GitHub Repo to learn more about this excellent screenshot utility.
Author: Joseph Brinkman
Contributors: Steven Spencer